Ayala Malls Accreditation
| Sales File / Data |
|
| Generated / Provided |
- Daily Sales Data (text file)
- Hourly Sales Data (text file)
- Z-Read Data (text file)
- EOD Sales Data (CSV file)
- Hourly Sales Data (CSV file)
|
| Sending Process |
- Hourly CSV are generated and synced to the store laptop every hour + 20 mins (buffer time)
- Other sales files are generated and synced at 6:00:00 am
|
| Front Office Changes |
|
| Ayala Sales File page on Settings page (Offline First APK v1) |
We use this page to setup the network shared folders for sending the sales files |
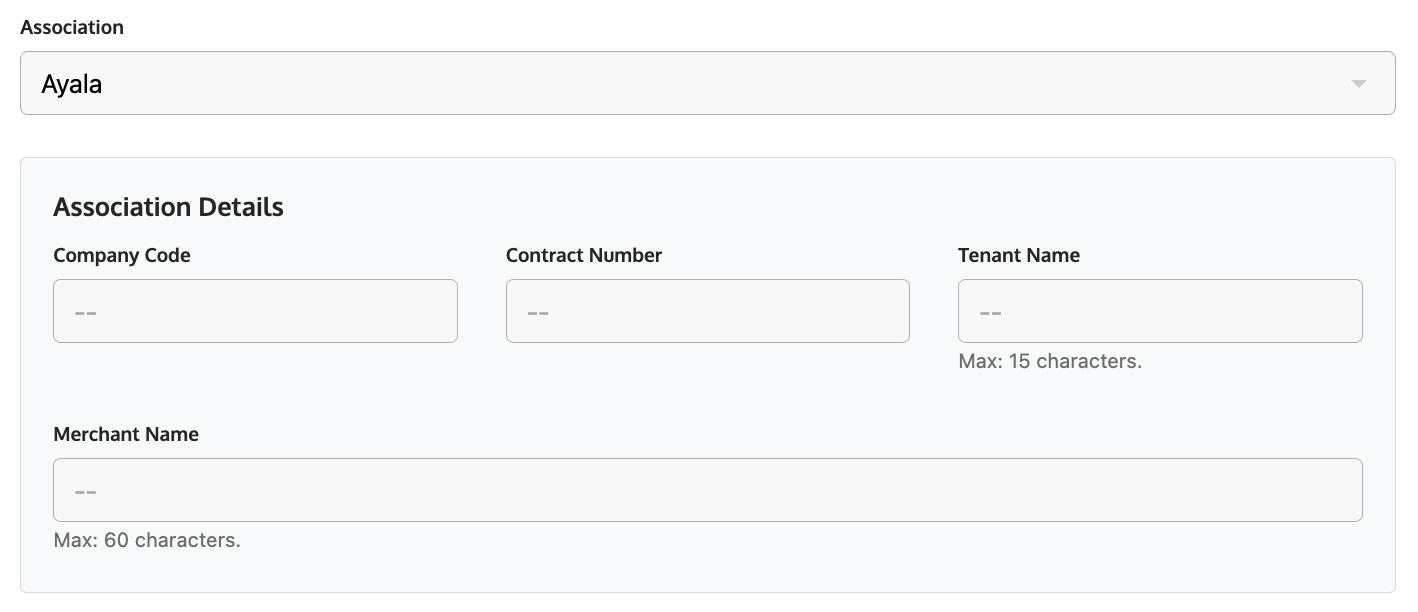
| Back Office Association Configuration |
|
| Company Code |
Provided by the mall admin.
The Company Code of each Ayala mall
|
| Contract Number |
Provided by the mall admin.
The unique Contract Number of each store set by mall admin.
|
| Tenant Name |
Provided by the mall admin.
The name of the store set by mall admin.
|
| Merchant Name |
Provided by the mall admin.
The longer name of the store set by mall admin.
|
| Activate for new store / location |
|
The following steps should be done everytime we have new locations to onboard:
- The client will send a request to Ayala Mall IT Team for the Company Code, Contract Number, Tenant Name and Merchant Name.
- The client or Ayala team will forward the details to Mosaic Team (Data Implem) for laptop configuration.
- Mosaic Team (Data Implem) will encode the Company Code, Contract Number, Tenant Name and Merchant Name on the Back Office > Location details using Super Admin account.
- As part of Ayala’s requirements, the client needs to have a laptop or computer wherein sales will be consolidated and should be connected to the Ayala Network.
- Mosaic Team (Support) will install their Tenant API (orange app) to this computer.
- Mosaic Team (Support) will also install a program that will automatically download the sales files and upload them to local network folder shared with Ayala.
- Install new APK and set the location as "Ayala" on the first screen.
- That’s it! Sales files will be automatically sent to Ayala every hour and at 6:00 am. The laptop must be up for the whole business day and 6:00 am.
|
Troubleshooting
| Concern |
Details |
Resolution |
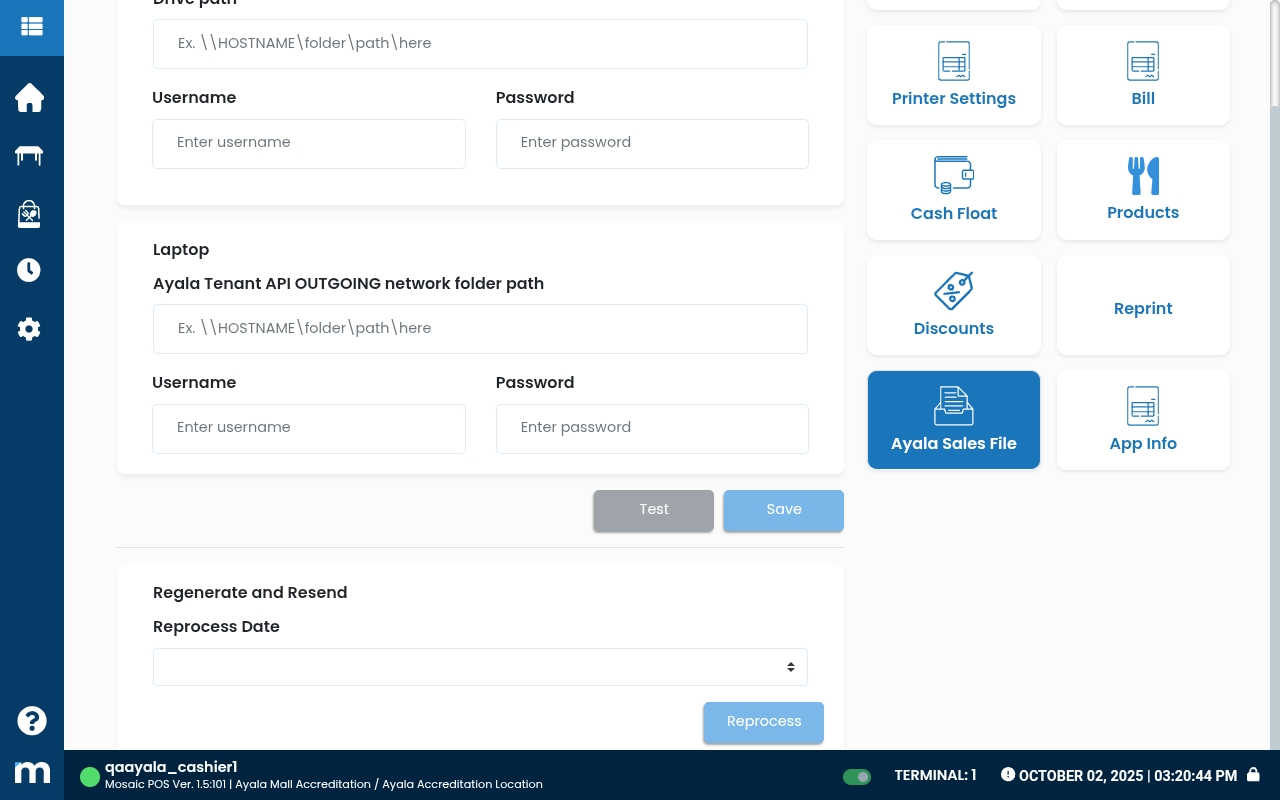
| Reprocess sales files |
Ayala might request to reprocess sales files for following reasons:
- no eod synced to Ayala
- errors
- if the error has "Cross Validation, Discrepancy (15) NO_TRN (##) not equal to total of transaction (##)", this means some transactions were not reflected on Hourly CSV
|
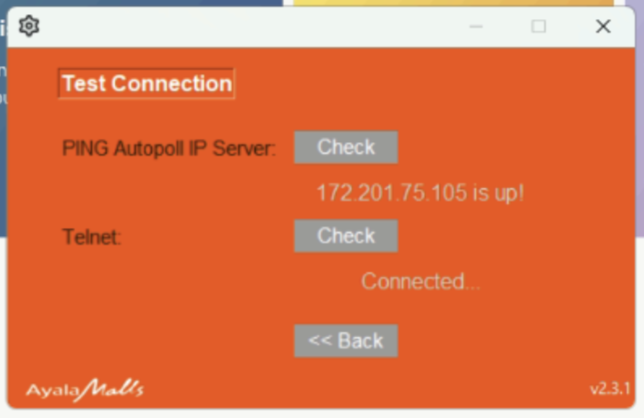
- Advise the store to check the orange app, a.k.a. telnet connection, on the laptop. Make sure that telnet is Connected
- On POS > Settings > Ayala Sales File, check if the paths have been setup
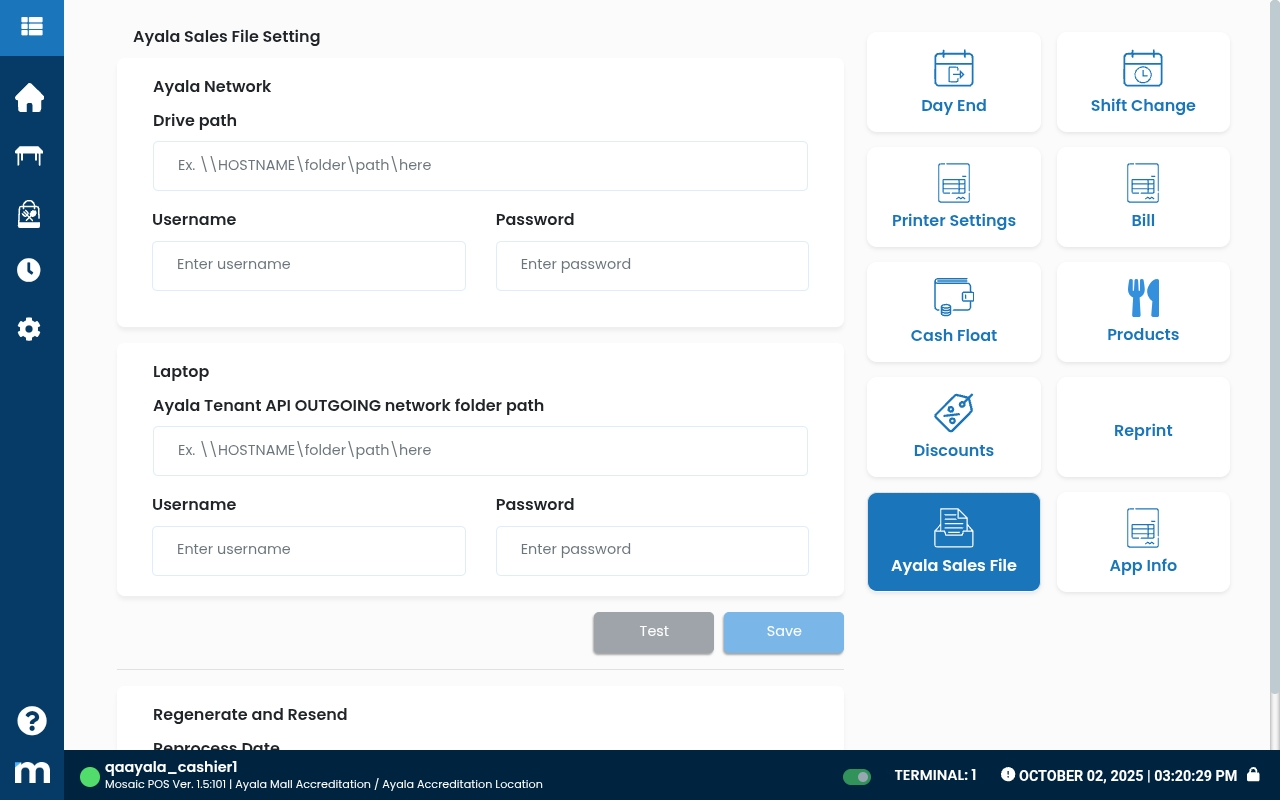
- On POS > Settings > Ayala Sales File > Regenerate and Resend
|
| Project Uno Sync Alert |
This dialog shows up when there's an issue on the Settings page
- Not configured on Ayala Sales File page
- Incorrect credentials on Ayala Sales File page
|
- On POS, log in and go to Settings page
- Click Ayala Sales File on the right side of the screen
- Make sure that all fields are filled out
- Click Test to test the connections
- Successful: It will show a successful message if successfully connected to the folders
- Failed: Re-confirm the URL and credentials with Ayala mall admin
|
Activation and Sending Process Detailed
|
|
- Prepare the POS Location ID, AWS Keys and C/D folders
|
- Mosaic Data Implem or Support will encode the Loc ID, Tenant (Location Name) and Back Office Username on this file: Mall Sales Files Sending Credentials
- Mosaic Support to request the AWS Keys Generation throught Teams Group Chat: Ayala AWS Keys Generation Request
- Mosaic Dev (Dex) will encode the AWS Keys on this file: Mall Sales Files Sending Credentials
- Mosaic Support to create the C/D folders
-
Path to the Ayala folder for text files. Note that Ayala has instructed us to install Project UNO here as well
Example: D:\Ayala
-
Path to the Ayala Tenant API’s OUTGOING folder. The laptop must have the Ayala Tenant API program
Example: C: or D:\Ayala\tenant_api\storage\app\OUTGOING
|
- Request for the sales file and laptop config details
|
- Client to reach out to Ayala Mall IT team for the following and request to send to us (JC)
- Company Code
- Contract Number
- Tenant Name
- Merchant Name
- Mall Autopoll IP Server
- Network Details
- Mosaic Support to encode the details on this file: Mall Sales Files Sending Credentials
|
- Set up the Mosaic Script on laptop
|
- Mosaic Support to Download the script ZIP file at Mosaic Ayala Script and unzip its contents on C disk
-
Double click on install.bat. A Command Prompt window will briefly appear then go
away.
a. This copies files to the C:\Mosaic\ folder and configures the ayala-sync script
to run hourly.
-
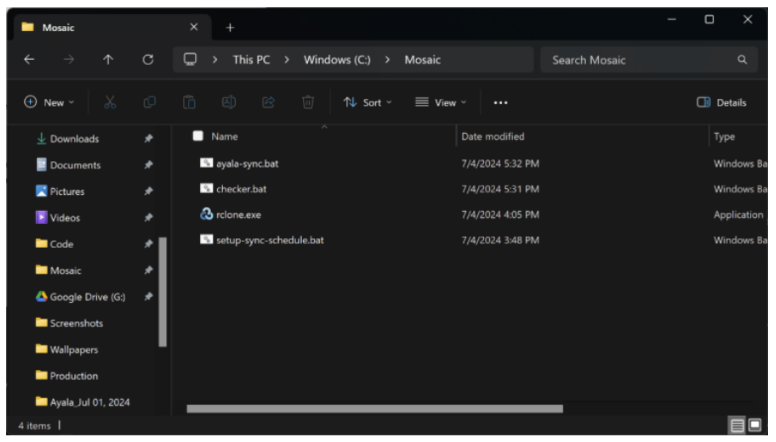
Check the C:\Mosaic folder and verify that all files have been copied:
Set up AWS credentials
- Open a Command Prompt and type: C:\Mosaic\rclone config
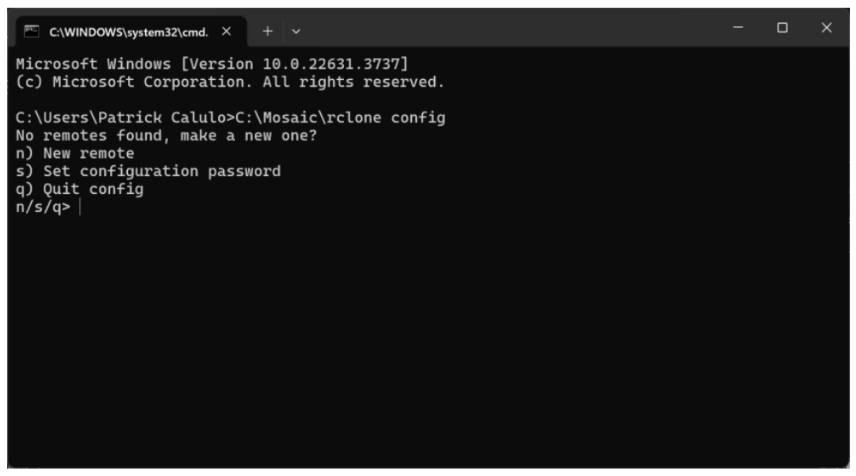
-
Type n and hit Enter.
a. All inputs from here onwards are case-sensitive!
- When asked for a name, type mosaic-s3a. This must be named mosaic-s3 to work.
- When prompted for “Storage”, type s3
- For “provider”, type AWS
- When prompted for “env_auth”, type 1
-
You should now be at an access_key_id prompt. Paste the AWS Access Key for this
location.
- For secret_access_key, paste the AWS Secret Access Key for this location.
- For region, type ap-southeast-1
-
For the following prompts after this, just hit enter:
a. Endpoint
b. location_constraint
c. server_side_encryption
d. sse_kms_key_id
e. storage_class
- For Edit advanced config? choose n
-
You will be asked to confirm the endpoint settings. Confirm that everything is
correct (especially the access keys) then answer with y
- A list of remotes will be shown. It should contains mosaic-s3
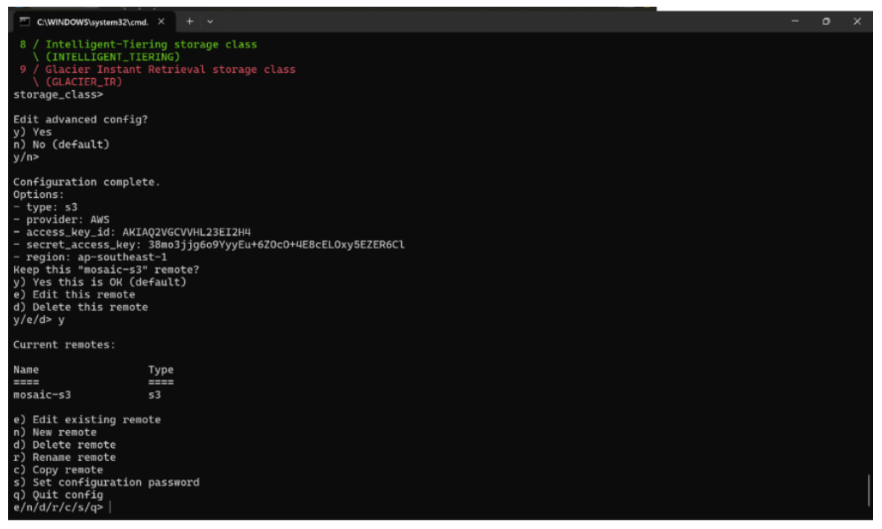
- Type q and hit Enter to exit.
Set up environment variables
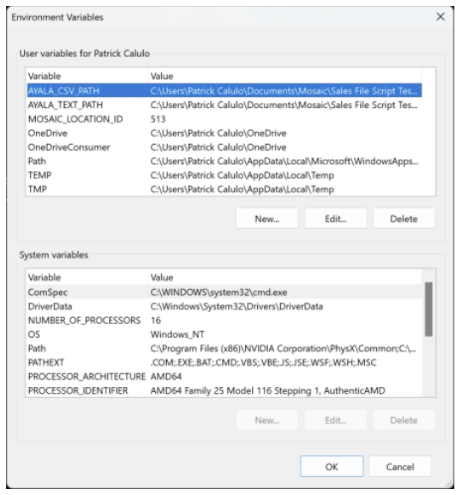
- Open the Start menu and search for “environment variables”
- Click on “Edit environment variables for your account”. Something like this should appear. Set this aside for now
-
Open Windows Explorer then navigate to the Ayala Tenant API’s OUTGOING folder.
It may be somewhere under a tenant_api folder. Copy the path to this folder from the
address bar.
- In the Environment Variables window’s “User variables for “New...”
- Add a variable named AYALA_CSV_PATH and paste the path in the value box
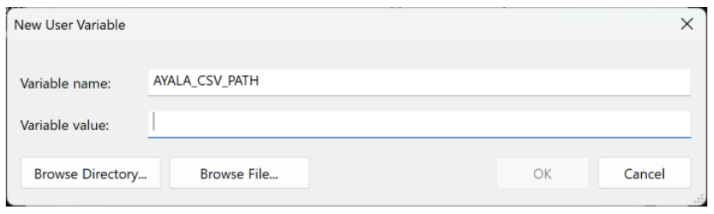
- Hit OK.
- Go back to Windows Explorer and navigate to the shared folder for this location’s sales files. Copy the path to this folder from the address bar.
- This is the folder where we will be automatically creating folders for each year, inside of which will be sales files
- Do not select a specific year’s folder, that means you went one level too deep in the folder hierarchy
- Return to the Environment Variables window and create a new variable called AYALA_TEXT_PATH. Paste the folder path in the value box, then hit OK.
- Create an environment variable named MOSAIC_LOCATION_ID and set its value to the location ID of the location being set up
- In the Environment Variables window, hit OK.
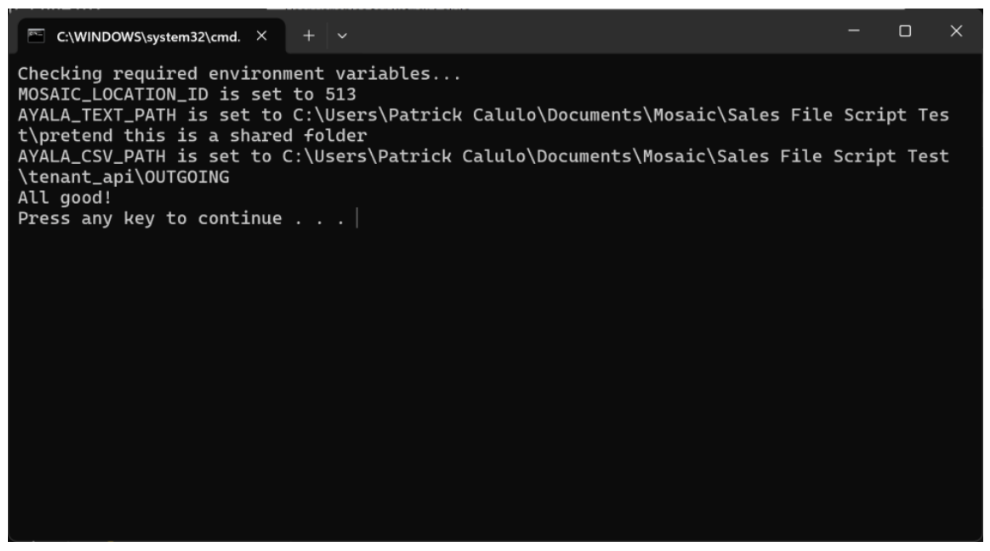
Checking the setup
- Open the C:\Mosaic folder
- Double-click on checker.bat. It will indicate if all expected environment variables have been created. Otherwise, check that all environment variables were correctly set up.
- Note that this only checks the existence of environment variables. Make sure the values that are in them are correct
You're done!
|
- Set up the Ayala Project Uno on laptop
|
- Support / Ayala Mall IT Team to download the Ayala Tenant API from — and install on the laptop
- Telnet status should be "Connected" in order to sync the sales files to Ayala
|
- Encode the Back Office Association Details
|
- Data Implem to encode the following on Back Office:
- Company Code
- Contract Number
- Tenant Name
- Merchant Name
|
- Send the previous days' sales files (as per request)
|
- Log in on Back Office using the location's store admin access
- Go to Reports menu
- Go to Sales Text File menu
- Select the date range of the sales files
- Click Generate or Batch Generate
|


